Pages

My Crafty Friends!

Wednesday, January 25, 2012

Crafty Designers Day at Craft Junkie Too ~~ Valentines' Day Treats!


Well hello everyone!  Can you believe it's almost the end of January already and will be Valentines' Day soon??  OMGoodness.....I'm so excited that today's theme for the Crafty Designers Day at Craft Junkie Too was create a Valentines' Day project for a class (cards, treats, etc.)....something that's easy to mass produce!


Well last year I created the recycled papertowel roll treats for Carley's class & teachers at daycare!  They they turned out so cute I thought.  And since that post (at the time, I could not recall where I 'lifted' the idea for them), I do remember now of course where I got the idea for them.....I just ironically didn't know that just a few short months later, I'd be on that crafty person's team!! :)  Thanks Tracy!  :)

So this year, I wanted to create something different (even though my hubby has fussed all year long about me saving papertowel rolls! ha!)  Now, I have to give credit where credit is due on this year's Valentine treat.....and I wanted to create an easily mass produced treat! So I was browsing all my crafty friends' blogs for ideas and found this treat on Nikki's blog, Crafty Nikki. She has some awesome stuff!


Of course, these really weren't that hard to reproduce.....it's just that I LOVE to embellish and well, that was a lot of detail.....but that's what it's about right!?!  Valentines' Day.....LOVE?  :)  You could definitely go much simpler on these and use already patterend cardstock, or stickers, etc. but like I said, I LOVE to embellish and detail!

So first of all, I want to give credit as well to Karen at Papercraft Memories for the wordart I used to create the tags for these treats!  She has some amazing stuff over there....check out her blog!


So here's all the pieces it took to create these treats that I made.....all 19 of them! I know, why such an odd number.....well......I sorta had to sample some of the candy so therefore there were only 19 left! ha!  But really, that's exactly how many people I had listed as well.  But actually I'll probably make a few more, but will have to get more candy of course to do so!  :)


I loved the idea that Nikki had for these treats, but I did change the measurements up a little for mine.....I basically started with 8.5" x 11"sheets of red, pink, and white cardstock and cut them in half lengthwise.  I used my Creative Memories corner punch as well on these.  Then I scored them from each end at 4.25" and folded them to create a tent card.  Then I simply used several patterned 12x12 Valentine papers and cut them into 3x4 rectangles and attached matching ones on each side of the cards.....yup, that was 38 of them I cut! :)

I used two cartridges for my heart images.  For the top layer hearts with the initials and the word "from:", I cut them at 2.25" from the Simply Sweet cartridge.  I just cut each initial for each child and teacher they were for, then I ran them thru my Cuttlebug in the Distressed Stripes folder for added texture.  Then I cut the 'frilly' bottom layer hearts at 2.5" from the Doodlecharms cartridge.  Who knew that they were the same shaped heart? :)


There were the yummy treats that I attached with a glue dot on the inside of the tent cards! :) After putting these on the inside, I also cut a strip of red tulle a little wider than the treat and slid it behind the candy so there was a little showing on the sides.....sorta like a bowtie! (You can sorta see it in the picture below.)


I assemble the layered hearts then attached them to the cards/treats.  I punched holes with my Crop-A-Dile, then tied on some almost ALL of my Cherry Red Traditional Bakers Twine from My Craft Spot!  Aggh, will have to get more!  :)


I attached the 'from:' hearts onto the back of the treats and stamped a small heart and wrote Carley's name on them.


Here's the side view of their yummy, cute treats! :)

This one is Carley's of course.....she had to have one from mommy too! :)  But here is where I used the wordart from Karen and just simply printed these cute "A friend loveth at all times" tags off onto white cardstock, trimmed them, used my corner punch on them, and then my Fiskars circle punch on the bottom of them...under the verse.  Of course, these were all for her 'friends'!


The pink tags below (even though the picture makes them look purple), I made with my Creative Memories tag punch and again, printed wordart from Karen.....saying "Thank you for loving me".....these went on the ones for her teachers. :)


These are the teachers' treats!  I love them!!

I hope all of her friends and teachers love them too!  They'll have a little Valentine party on Valentines' Day at her daycare so I plan to go and give these out....since I don't have school on Tuesdays! :)

I hope these inspired you to create some 'loving' projects and come back anytime!  Be sure to check out the other designers' treats as they have some really cool ideas to share! :)


Happy Crafting!


Friday, January 20, 2012

My Blogoversary & Some Cards I've Made...


Well, yeah.......I missed it a couple days ago...the 18th!....It was kind of a crazy day here.....there was a lockdown on the campus of my college for a gunman.....so yeah, the police never found him and well, all is well now.  But it WAS a crazy day.

I can't believe it's been a year since I started my blog and wow, how I have created so much with that lovely Cricut Expression my hubby got me for Christmas last year....or, eh...should I say two Christmases ago now! :)  It has been so much fun!

And soooo much has changed in the last year.......man, has so much changed and God has his reasons....and I have to trust in Him that they are for the good and that He will bring me through it......me and my family.  I haven't crafted much in say.....the last month or so, but I have created some things here and there.......so I wanted to show you some cards I've made.....just maybe didn't feel so much about blogging or when I actually did attempt to, Blogger was having a crazy issue and I couldn't.....imagine that......ha!  But it's no biggie!  Not gonna stress about it....I've learned, that doesn't really help anyway!  :)  Just create something instead!
So onto the cards......(and in no chronological order either!)  :)
This card I made for my cousin (sister in law), Allison for her birthday. (Yes, she's the one that got married in October 2011 and I've yet to post the pics of the decor I made for her wedding shower and her wedding.....but I'll get around to it!)  :) Anyway, I used the Paper Shapers 3" Scalloped Circle Punch on the front of this card, then actually just hand cut a circle, inked it, and stamped it with a $1 birthday stamp.  I added some bling of course and some turquoise ribbon as well.

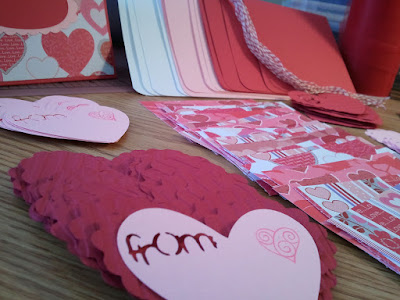
On the envelope, (seen above) I cut a flower shape from the Paisely cartridge and added an "A" monogram sticker for "Allison".  On the inside of the card, I added some small rhinestone-flower stickers (sorry, I forget the brand) for a final detail. Actually from that same set of stickers, I added an orange flower to the front of the card as well (in the top left corner of the card).

~~~~~~~~~~~~~~~~~~~~~~~~~~~~~~~~~~~~~~~~~~~~~~~

This card, I made for my friend, Teresa's birthday! She is married to the pastor at the church we used to attend.  She is a dear friend and says she feels like she could be my mom because her son graduated with me! :) Her birthday is the day after Carley's and with them being so close to Christmas, we of course, can NEVER get together close to that date so it's just 'whenever' we can before Christmas and exchange Christmas gifts and her & Carley's birthday gifts....and sometimes mine too if we couldn't get together in Septenber!  Ha!  But for this card, I again used the Paper Shapers 3" Scalloped Circle Punch to cut two circles and then I inked and stamped the beige one with a $1 birthday stamp and my "God Bless You" stamp.  I added a piece of beige satin ribbon under the circles then on top of the circles, added a piece of green paper to the bottom of the card as well as a shorter piece to the center.  On the strip in the center, I punched the ends with my Fiskars heart circle punch and then I added some bling to finish it off.

I guess I forgot to take a picture of the inside of the card....oops.  But all the while, she loved it! :)

~~~~~~~~~~~~~~~~~~~~~~~~~~~~~~~~~~~~~~~~~~~~~~~

This card I made for my friend & pastor's wife, Angie for her birthday.  The flowers are from Bo Bunny and the brad, lace, and ribbon are just all from my stash.  I used the Creative Memories Stork's Delivery cartridge to make the sentiment tag on the front of the card.  I also used one of my $1 birthday stamps and blue ink on the edges.

A close-up!


On the inside, I used my Martha Stewart doily punch and a birthday sentiment stamp from My Pink Stamper.

~~~~~~~~~~~~~~~~~~~~~~~~~~~~~~~~~~~~~~~~~~~~~~~

No you're not seeing double.....I just made two identical cards!  Well almost.... :)
These are both anniversary cards that I made for my paster and his wife, and my for my grandparents....both celebrating wedding anniversaries in December!  Not to mention our anniversary is in December as well. :)  Popular month to get married, huh?

Anyway with these cards, I used the Paper Shapers 3" Scalloped Circle Punch to cut several circles. Obviously, the circles get smaller as you can see, but I just manually moved an already punch 3" circle around and made it smaller by using the same punch.  They are not symmetrical, but that was the whole point.....to make sorta smaller "flowers".  After inking the beige "flowers" and turning up their "petals" a bit, I added a flower sticker from Jolee's to the very center of these.  Then I hand-created a layered sentiment tag and stamped them with "God Bless You".


On the insides of the cards, I stamped in the same ink "Happy Anniversary" from my $1 bin of stamps!  (Love that bin!)  Then on the opposite page, I punched from a shimmery, orange cardstock & adhered two butterflies to each card. Then in the center of these butterflies, I added a monogrammed sticker to represent their last names.


They loved their cards! :)

~~~~~~~~~~~~~~~~~~~~~~~~~~~~~~~~~~~~~~~~~~~~~~~

This card I made for our church......they give our family a love offering which was a huge blessing. Just when we sometimes start worrying or stressing about something, we have to remember to pray that God will take care of our situations....whatever they may be, and just then He answers your prayers and you get a blessing! It's wonderful how He just works those things out! For the tag on this card, I used the Creative Memories Tag punch and just punched it on both ends to create this neat shape. Then I added a "Thank You" sticker from Jolee's. I then added a couple red rhinestones and some glittered red ribbon to finish off the front.

On the inside, I simply used my "God Bless You" stamp in between the ribbons.

~~~~~~~~~~~~~~~~~~~~~~~~~~~~~~~~~~~~~~~~~~~~~~~

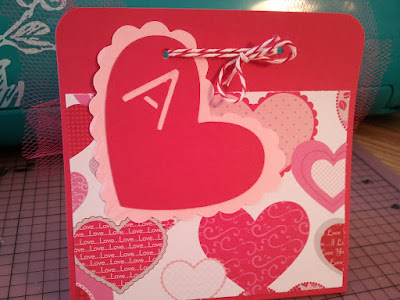
And finally, this card I made for a friend's daughter, Indigo, who turned 3!  She is almost exactly a year older than Carley.....and they go to school (daycare) together!  She had a 'groovy', 'hippie chic' themed birthday party which was 'FAR OUT'!!  :)  We painted pottery and Carley had a blast!  I made this card using the Groovy Times cartidge of course! Added some bling, buttons and twine to finish it off! :)


On the inside of the card, I used my Creative Memories punch (sorry I don't know the name of it because I believe it's retired) to create the little flowers and one of my $1 birthday stamps.

~~~~~~~~~~~~~~~~~~~~~~~~~~~~~~~~~~~~~~~~~~~~~~~

Wow, that felt good to get caught up on some of my blogging for the cards I had made in the last few months.  It's so easy to get behind when "life" takes over....but it's ok.  I'm not gonna stress about it!  :) 

Well, until next time when I share more goodies.....there are some banners, more cards, Carley's birthday, and some Christmas presents that I know I've promised to share as well as the wedding stuff I did for my cousin now sister-in-law!  :)


Wednesday, January 11, 2012

Crafty Designers Day at Craft Junkie Too!

Happy New Year everyone! 

OK, so I know it's like the 11th, but I hadn't posted since last year!  :) Yes, I totally enjoyed the holidays and did what I wanted! Ha!  :)  I do apologize for not posting much lately, but really....I took the time to spend with my family and do some of the important things in life with them.  I did do some crafting and will eventually share them with you all.  I do have soooo many things I've created really over the last few months, but life just kinda happened and well the blogging didn't.  But they're still out there and I'll share them soon.

But it's back to the grind now...as well as the Craft Junkie Too's Design Team!  Our first challenge of the year was to create something with "cool" colors/images....like snow, ice, etc.  So I decided to do a layout because I had so many snow pictures to choose from, with living in NC!  However, then I had the trouble of narrowing down which ones I wanted to scrap with! Ugh, decisions....decisions!  :)  But I decided rather than looking thru the past, that I'd scrap one single recent picture of my daughter this Christmas! 

Now she just turned 2, (10 days before Christmas to be exact!) and well, let's just say this Christmas was much more adventurous and fun with her than last year!  She was into everything.....and of course talking more now......about "BabaJesus" as she would say, Santa Clause, Rudolph, and Frosty!  She LOVED Frosty the Snowman!  We had to watch it at least ONCE a day for the whole month of December! Haha! Seriously. 

Well, we've had this snowman decoration for several years now, that is just a tad taller than Carley.  She would literally have random conversations with this snowman and would say that his name was Frosty!  It was too funny!  Sometimes she would fuss at him, tell him what to do, and even sing to him! Occasionally, you would catch her dragging him around beside her.....and sometimes would pretend to feed him!  Ha!  The funniest moment however, was when we were packing up our Christmas decorations.  And it was time to pack up 'Frosty'...Carley was NOT about to part with her new friend and did not wanna let go!  It was priceless.  It was definitely a memory maker....especially when she hugged & kissed him and told him "I love you" with tears in her eyes!  :) So that photo is the one I picked! :)  Onto my layout.....


I used several cartridges on this layout.......the Winter Wonderland cartridge to cut the snowflake & the title "Frosty Kisses", which seemed so appropriate! :) I used the Doodlecharms cartridge to cut the snowman and I used the Sesame Street Seasons cartridge to cut the toboggan for the snowman.  I altered the toboggan a little since it didn't actually "go with" the snowman, but I thought it turned out cute! 


 I used my white gel pen for accents on the snowman and the title as well as adding glitter glue to the snowflake and the toboggan.


Loved this title! :)


The main background paper used was from Moxxie....titled 'Winter Wishes'.  The paper used for the photo mat, title letters, journaling tag, and the snowflake were from Creative Memories.....as well as the snowflake punch used on the photo.  And for final finishing touches.....the snowflake border strip and buttons were from Martha Stewart Holidays embellishments.

Well, I hope you enjoyed this layout as much as I did creating it!  Be sure to check out the rest of the Crafty Designers at Craft Junkie Too for more "COOL" projects!


Thanks for visiting!  Until next time...
Oh yeah......one more week is my 1 yr Blogoversary!  Wow how time flies! :)


*Entered at Anything Goes - Challenge #58 - Anything Goes!