Pages

My Crafty Friends!

Thursday, October 13, 2011

Doubly Blessed! :)

Well, that's what some friends of ours are.....doubly blessed.....with two beautiful twins.....born almost on my birthday!  :)  Oh, so close!  :)  But they were blessed with a boy and a girl and they now have such a cute little family!  I'm so happy for them and can't wait to see them!
Congratulations Chris & Shannon!

Well, I know I mentioned it awhile back that I was making them a banner and boy was it a challenge!  Before they were born, they wanted their genders to be a surprise, so picking a theme, colors, etc. was really hard to do for me!  But I think that I pulled it off!  I see that they've received it by mail so I figured it was safe to make the post official!


Since I found these cute little sheep stickers (forgive me, I forgot what brand they were) I found this cute saying online somewhere....."Always Know We Love 'Ewe' So!" and printed it on beige cardstock.  Then I cut out the scalloped circles with a 3" Paper Shapers paper punch (that I borrowed from my friend Gina, thanks girl!). This saying was perfect for this banner I thought! I then added "2011" to the end as well.


These sheep stickers originally had a "1", "2", and "3" on them as in the 'counting sheep'......but I removed those and used just the sheep to match these coordinating sheep papers called 'Welcome Baby' from an 8x8 paper pad that I got at Big Lots.


The other pattern also from that paper pad had cute baby items such as blocks, bottles, and rattles.  I found these 3D rattle stickers as well that just went perfect with this paper.


I finished off the banner by inking all the edges of the papers in brown ink and tied them together with a sage green ribbon from AC Moore and some beige tulle.  The pennant shapes are from the Songbird cartridge....you may notice that A LOT of my banners are this shape!  It's just a good size and shape I think for banner pennants....lots of room for decorating! :)  I cut them from p.61 at 5.5".

 Like I said, I can't wait to see these little cuties.....Cora and Memphis!  Again, I'm so happy for their mom & dad and their new little family!  Such a blessing....or should I say two!  :)

Shelley

*Entered into the following challenge(s):


BLOG TITLE

Photobucket

and Top 5 Winner at Anything Goes Challenge #51: Die Cuts/Punches or Both!  Yay!


Tuesday, October 11, 2011

CJToo Design Team Day - Halloween Treats

Trick or Treat, smell my feet!  Heehee! 
I couldn't resist! 


It's that time of year.....all the Halloween decor is out and in full force!  It's amazing to me that people decorate their homes for Halloween these days like it's Christmas!  Lights and all!  :)  There are some pretty amazing displays out there too! 

But we can't forget the kiddos and their treats.....and that's what the Craft Junkie Too Design Team is sharing today!  Halloween Treats!  Check out Tracy's site for all the crafty designers' creations for Halloween treats!


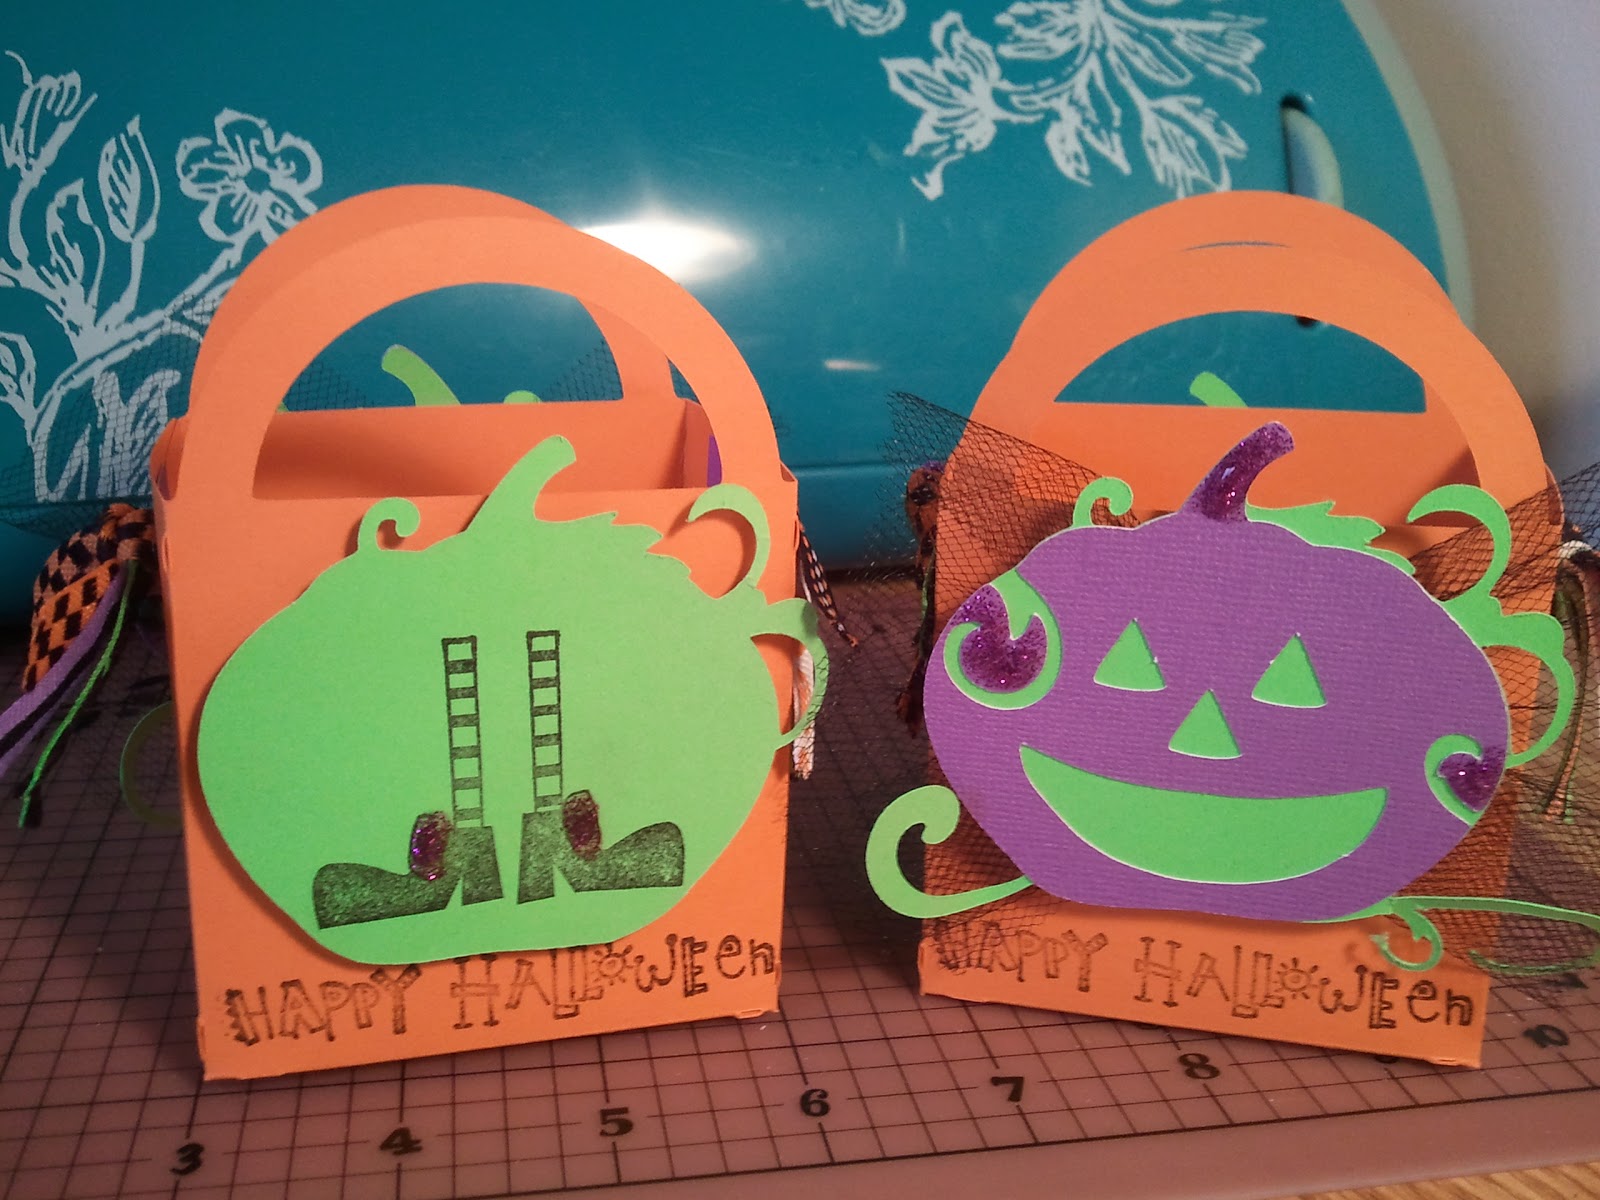
My Halloween treat was fun & easy to make!


I used two cartridges on these treats:

Celebrate with Flourish - for the pumpkin & layers
Slumber Party - for the treat box

I added black tulle behind the layered pumpkin and some purple glitter glue for detail.  I also used the Happy Halloween and witches' feet stamps which I purchased in the $1 bin at Michael's.  On the pumpkin with the witches' feet, you'll notice that I trimmed off the swirly vines that appear on the other pumpkin with the purple layer....just to change it up a bit.


Finally, I added this assortment of ribbon that I purchased also in the $1 bin from Target. They were perfect I thought for this treat box.  I should have photographed them, but I had the orange, silver, and black Hershey's Kisses in these little boxes!  Mmmmm, chocolate is always the best treat! :)

I hope you are inspired to make some crafty & yummy treats for your kiddos! 

Remember to check out the rest of the Design Teams creations at Craft Junkie Too!

Until next time.....

           Shelley

*Entered into the following challenge(s):

My little 3D pumpkin!

Hey everyone! 
I hope everyone is loving the fall weather we're having....at least the wonderful fall weather we've been having in NC has been great!  Well at least here where I live.....but not so much in the mountains where I headed to LAST weekend for the Autumn in Oz party....I ended up unfortunately turning around halfway there because it was 36 degrees, the wind was blowing like crazy, and a rain/snow mix was coming down!  I was soooo disappointed.  Courtney my niece who was dressed up as Dorothy was disappointed too, but not as much as me!  Booo hooo!  So we came home and watched the movie instead.....there's always next year I guess! 


Here is a pic of my daughter Carley and my niece Courtney in the car and all ready to head to the Land of Oz!  (Carley was going to be the Cowardly Lion, but I had figured it would be best to wait until we got there to put on her costume, but you can see how cute Courtney was as Dorothy!)

 And so anyway (yes, I'm still pouting...LOL).......I wanted to share with you a quick project I made this week.....it's a little 3D paper pumpkin!  I found this tutorial to make them because a friend of mine is having a pumpkin patch birthday party for her little boy for his 1st birthday!  It's going to be so cute!  We've made pumpkin centerpieces and working on a banner too.  These 3D pumpkins will be additional decor for the occasion which will I think will be so adorable!  We've used coordinating papers from the Recollections Night and Fall paper pad.


This pumpkin I also made from that paper pad, as it was my first one.  My friend wanted her pumpkins to be slightly larger so I cut strips at 10 inches long instead of the suggested 6 inches in the video.  However, I quickly learned that if you make it larger, then the number of strips needs to be increased as well.  So we're still working on that for her pumpkins. But on this pumpkin, I cut down the strips to actually 7 inches and it worked ok.  There are still some small gaps showing on the pumpkin, but I think it looks just fine.  I just hand cut some leaves and used my white gel pen on them for detail.  Then I made a curly vine out of the same black cardstock I used for one of the leaves by dampening it, then wrapping it around a pen and letting it dry. 

When we get the 'pumpkin patch' pumpkins made, I'll be sure to post all of those.....along with the centerpieces and the banner.

Hope you have a wonderful crafting week!