Pages

My Crafty Friends!

Wednesday, June 29, 2011

Hooray for Red, White, and Blue!


Happy Birthday America!!  Happy 4th of July! 
Hooray for Red, White, and Blue!
For the CraftJunkieToo's Design Team project, I created this layout using pictures of my daughter Carley when she was 6 months old last 4th of July!  I can't believe how fast she's growing up!  She was just sitting up pretty good in these pics and now she's running all over the place and trying to talk!  Whew how time flies! 
But doing this layout brought back the precious memories from just a short year ago!


 I used 4th of July stickers from Sandylions Essentials on this layout and patterned paper from The Paper Studio.


I used a tiny US flag banner from Jolee's and attached it with white and red star shaped eyelets.  For journaling, I just created a rocket out of a scrap of the red paper used and added a smaller white piece where I wrote my title "My Little Firecracker!" and date of the picture, then added it with pop dots.


I used the Cherry Red Traditional Bakers Twine behind the photos and used my Paper Doll Dress Up cartridge to cut the stars border, pg.78. I cut these red & white star borders at 2" and layered them. Then I added the red, silver, and blue buttons. I trimmed off one of the white stars (since almost half of it went under the larger photo anyway) and inked its edges in red and placed it in the top right corner on pop dots. I also inked the other white stars as well as the photo mats.  To finish it off, I added blue rhinestones to the red mat and red rhinestones to the patterned star mat.


I hope you enjoyed this layout!  It was fun to create!  This year I'm sure she'll either love the fireworks or hate them....but last year she liked them so we'll see!  :)
Make sure you check out the rest of the "Red, White, and Blue" CJToo's Design Teams Projects!

I hope that everyone has a fun and safe 4th of July holiday! 

PS....My hubby's birthday is July 4th so check back soon for a view of his birthday card! :)


Sunday, June 26, 2011

Happy Birthday Byron!

Happy 13th Birthday Byron! 

Byron is my cousin Rhonda's son, (the one that just had a birthday) and yes, her son's birthday is 10 days from her birthday.  Now, I know that he is now a teenager, and he still loves video games of all kinds.  I know even when I was young, that Rhonda & I loved to play Super Mario Bros. and well of course Byron loves it too.  So that's what inspired this birthday card!  :) 


First of all, I printed a masculine template that I downloaded from www.itsybitsypaper.com onto white cardstock for the background for the front of this card.  In the template, I added a Super Mario Bros. quote "Eat cake, shell scum!" in yellow to show up on the blue area of the background.  (If you're not a Super Mario fan, then this quote would make no sense to you! haha!) 

I then cut the mushroom at 2.25" from pg. 32 of the Create A Critter cartridge.  I added the eyes with a fine point black Sharpie and used my white gel pen for detail.  I downloaded some Super Mario Bros. clip art and printed it on some white cardstock as well.....I got the stars, the bricks, and the "?" blocks.  I added these with pop dots as well as the mushroom. 

In Word, I also printed the "1 UP!" phrase in a "computer/video game/tech-y" font and cut these into little "clouds" to put inside the card (as well as one on the front as seen in the picture above). 


When Byron opened his card this evening at a family cookout, he told me that it was the "most AWESOME card ever"!  That made me feel so good since I wasn't even sure he'd really like it all (being a boy and all!)  :)  But he did correct me to say that the mushroom "should have been green instead of red" in order to have the "1 UP!"......I told him that it had been a loooong time since I had played and well, he'd just have to take the red one for now :) ........but he DID like it....as well as everyone else.  Yay!

Happy Birthday Byron!

Love your 2nd cuz,
                   Shelley

**Entered into Made It Myself Mondays!

Happy Birthday Cuz!

Happy Birthday to my cousin Rhonda! 

Rhonda and I are only 9 months apart and practically grew up like sisters.....so much that we even dressed alike and everyone thought we were twins!  haha!  We were pretty much inseparable growing up and did everything together!  When school was out for the summer, that's where I was until the week before school started up again....I think my aunt and uncle often wondered if they could claim me on their taxes!  Haha!


But anyway, for her birthday I created this card.....and I know she likes frogs so I cut the Create A Critter frog and its layers on pg. 24 at 2.75".  I used my Seeing Spots Cuttlebug folder to emboss the frog.  I also cut the phrase bubble on pg.60 at 2" (flipped it over so it was pointing at the frog) and stamped it with a $1 "Happy Birthday" stamp I picked up at Mighty Dollar.  I added these to the front of the card with pop dots.  I also cut the lily pad at 2.75" and added a cute little butterfly paper button from Creative Memories with pop dots.  I used my Martha Stewart Doily Punch on the bottom of the card as well.


On the inside I added a strip of the same green paper used for the frog and used the punch on it as well.  I cut the other phrase bubble on pg 60 at 2" as well and added it as a "pink puffy cloud".  (Hey it's pretend, so it can be pink, right?)  :)  Then I added a green stem I had from a pack of Jolee's (I think) flowers, and added another Creative Memories paper button with the Spring Green Traditional Bakers Twine tied in a bow in the center of it.  Then I used my set of My Craft Spot stamps for the sentiment.

She loved this card.....and I love her!  :)

Happy Birthday Rhonda!

Love your cuz,
                 Shelley

Sunday, June 19, 2011

Happy Fathers' Day!

Happy Father's Day!

Dad, your guiding hand on my shoulder
will remain with me forever.
~Author Unknown
```````````````````````````````````````````````````````````````
First of all, Happy Father's Day to all you dads out there!  I had hoped to get this posted earlier, but Carley is cutting teeth and well, let's just say I've been busy!  :)

But I wanted to share the cards that I made for my hubby and for my own dad.  For my dad's card, I couldn't find just the right shade of green for this card so I just went with yellow.  I wasn't completely happy with how it turned out, but I know my dad will love it otherwise. :)  That's why he's a great dad....unconditional love!  Whew, just like our Father in heaven loves us unconditionally!  Can I get an Amen!?!  :)


For the front of my dad's card, I used the Playtime cartridge to cut the tag image at 2.5".  I used a Father's Day $1 stamp that I picked up at AC Moore for the "happy father's day" and the "you're the best" with the star.  For the "for Dad" image, I used Celebrate With Flourish cartridge to cut it at 1.5".  I altered the original #1 Dad image and then used the Playtime cartidge again and cut the 'forever young' sentiment.  I took this sentiment and just cut off the "for" to insert into the circle.  Then I inked all the images & the card and added some green & brown polka dot ribbon I had as well as some bronze brads.


For the inside, I had cut another tag image originally for the front, but it was too small.  So I trimmed off one end of it, inked it, and again used the $1 Father's Day stamps.  I added a strip of the matching yellow cardstock and added a sticker that says, "i'm so glad you're my dad".

~~~~~~~~~~~~~~~~~~~~~~~~~~~~~~~~~~~~~~~~~~~~~

For my hubby, I made a shaped card.  (OK, so I don't have a Gypsy..... but I do have Design Studio however, I haven't even played with welding shapes together to make cards......so I cheated and used some blank white scalloped cards I had also picked up at AC Moore for $1!) :)


I traced the scalloped card onto the back of some patterned paper, then adhered it on and inked all edges of the card.  I then used my Celebrate with Flourish cartridge again to cut the "#1 Dad" image at 3".  I inked these layers as well and used pop-dots to attach it to the card.


For the inside, I used my $1 stamps again and helped Carley sign it. :)  On the left , (as a last minute thought!) I remembered a picture that I had taken last weekend that he had mentioned he really liked, so I printed it on regular printer paper and again traced the scalloped card shape on the back of it and cut it out.  I adhered this on and at the top, wrote the first thing that came to mind (as if Carley were thinking it).....it says, "Glad you're by my side!" 

I had snapped this picture as we were leaving Rail Days in Spencer, NC last weekend. They were so cute walking side-by-side eating the fresh popped kettle corn we had just bought.  It is just one of the many great memories we will have of Carley she is growing up!  :)

Happy Fathers' Day!

Shelley


Friday, June 17, 2011

A New Arrival!

Congratulations to Jeannie and Shannon on their new arrival, Alana Memphis! 
(Remember the cutesy Woodland critters banner I made a few weeks back??)  :)  Well, she's finally here and they are doing great!  I'm so excited for them as well as for her BIG sister Indigo who is exactly 2 1/2 today as well!  I know she will be a great big sister to Alana! 

I plan to visit them tomorrow at the hospital so I made them this card for their 'Sweet Baby Girl"!


First of all, I used my Cuttlebug to emboss the front of card with the Seeing Spots folder.  Then I added two brown eyelets and some Chocolate Traditional Bakers Twine.  I used the Creative Memories Stork's Delivery cartridge to cut the onesie and layers at 3".  For the sentiment, I just hand cut some of the matching green cardstock used for the onesie and used stamps from the Sweet Sentiments - Set #2 from My Craft Spot.  I adhered these cuts with dimensionals and inked them with brown ink.  I also inked the edges of the card as well - inside and out.


On the inside, I added a personal touch with a picture of mommy & baby that I printed from Facebook.  The picture was in sepia so I added to it brown metal photo corners.  Then I inked the edges of a piece of off-white cardstock with a torn edge, then stamped the sentiments in brown ink again.  These came from the same stamp set, Sweet Sentiments - Set #2 from My Craft Spot.

I can't wait to see her sweet baby girl Alana!  It just seemed like yesterday that my sweet baby Carley was born.  Yesterday, she was 18 months old!  Yikes, time is flying by! 

Have a great weekend everyone!  And Happy Fathers' Day!  :)

Shelley

**Submitted to the T.G.I.F. Linky Party over at Craft Junkie Too as
well as Made It Myself Mondays over at You Had Me At Craft!

Monday, June 13, 2011

Congrats to the Graduates of 2011!

It's that time of year again....graduation!  Well I had several young adults to make cards for and I wanted to make them something 'different'.....so I made them an easel card.  Tracy from CraftJunkieToo inspired me to make an easel card with her watermelon easel card so that's just what I did! 
Now, I had never made one before and it took me a little while to do it, but once I created one, then the others followed along pretty quickly, thank goodness!  :)  I really wondered if I could make another after that first one, but I did! ha!


I personalized each card to the graduate's school colors as well!


Here's the side view!


Here's the view of the inside!  I used a Graduate stamp I picked up at ACMoore for $1 and then used the Everyday Pop-Up Cards cartridge to cut the cap and tassel.  I cut these at 2.5".


I used a stamp set I had picked up on clearance awhile back to indicate the month and year which I thought turned out as a nice touch.


Below is a 4"x 6" paper that I printed with instructions for the frame/easel and a congratulations from me and my hubby!  I also used another graduate stamp that I picked up in the $1 bin at ACMoore!  I used the clear photo corners to adhere this so it would also hold their new 4"x 6" graduation photos!


Everyone loved their cards and mentioned that they had a picture already in mind to put in their new frames! :)

Congratulations again graduates of 2011!

Shelley
(**Entered into Made it Myself Mondays over at You Had Me At Craft!)

Wednesday, June 8, 2011

Summer Fun!


So today is the CJToo Design Team Project day and it's all about Summer Fun!  I hope that everyone has lots of fun this summer....spending time with family, relaxing when you can, and just making memories that will last! 

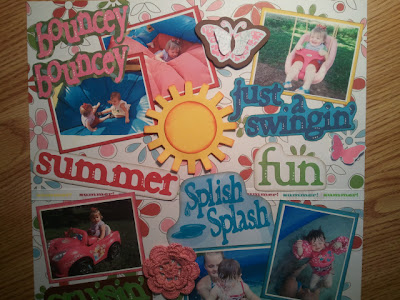
This past Saturday I certainly captured some memories of Carley while at a birthday party for a friend turning 2!  She had a blast!  As you can see in the pictures, she was into all sorts of fun summer activities, which I turned into a fun and busy layout that I hope you all enjoy! 


I cut all the words on Cricut Design Studio with the Classic Font cartridge.  For the puddle of water, I distorted an image from the From My Kitchen cartridge.  For the "Splish Splash" wording, below you can see where I used my Inkssentials Glossy Accents for the first time which I think turned out perfect!


I found some really cute ribbon with "summer!" on it that I just had to use on this layout! Also, I pop-dotted the hand cut butterfly (from patterned paper - at the top of the page) and the sun, which I cut from the Going Places cartridge at 3.25". On this I'll probably journal later, but I inked the edges of the sun with red ink as well as inked the edges of everything else with brown ink. I used my white gel pen too for some accents even under the Glossy Accents.


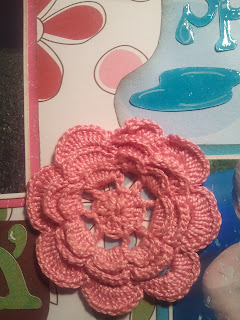
I have to mention one thing above on the layout......my grandmother knits all sorts of things and I was visiting her last week and saw that she had these little flowers that she had knitted. I asked her if she could make me a few for my scrapbooking. So Friday, I received a whole "goodie" box of flowers, leaves, and tiny rosettes! I can't wait to use them all. This is certainly something to treasure for Carley as she gets older knowing that her great-grandmother made them! :)  Getting to swing, bounce, ride, and swim were all "firsts" for Carley.  In a week, she'll be 18 months old and making this layout definitely captures those memories for her to look back on when we're older.  My little girl is growing so fast!  :(  <boo hoo!>  :)

Have a great Wednesday!

You can go to Tracy's blog at CraftJunkietoo.com and see what the rest of the design team created for Summer Fun!
Shelley

Tuesday, June 7, 2011

Happy 1st Birthday to Gavin!

I know I've posted for another Gavin I know (he turned 8 in April), but today was "little" Gavin's 1st birthday party!!  So for the little man, I made him this card below using the CM Stork's Delivery cartridge.  I failed to write down the image cut sizes on this one, sorry.  But I added some plain card stock as well as 'boyish' patterned paper to a simple white cardstock card and added the twine and a button!  (I really struggle with "boyish" stuff but I thought this turned out cute!)  :)


*Entered into the My Craft Spot - Monday Challenge
On the inside, I used the stamps I borrowed from Robin again and also added the "1" candle image from the Sweet Treats cartridge.

In addition to the card, I created him a banner since his mommy said they were just about to move into their new house!  She said this would be perfect for his new room!  Yay!
For this banner, I had many Cricut cuts so here's the list below:

Car (taxi altered) - from the Going Places cartridge - cut at 1.25"
Train - from the Playtime cartridge - cut at 1.75"
Cowboy Hat - from the Paper Doll Dress Up cartridge - cut at 2.25"
Tractor (altered) - from the Country Life cartridge - cut at 2"
Airplane - from the Everyday Pop-Up Cards cartridge - cut at 1.75"
And.... the banner pennants & layers were cut from the Country Life cartridge at 8.5".

Now here's some pics!  :)


 Some ribbon, jute, and some white gel pen accents finish this banner off just right! :)

 *Entered into the Week #20 of the CCCC (Cricut Cartridge Chaos Challengeover at Two Scraptastic Gals!
Published with Blogger-droid v1.6.8

Happy 2nd Birthday to Paizli!

Hello Everyone!  Happy June!  It seems like a-g-e-s since I've posted!!  Wow, I've been so busy and have so much now to post so here goes!  :)
Happy 2nd birthday sweet Paizli!  Your birthday party was fun and Carley had a blast!  She's still napping as I type this! :)
But below is what I created for Paizli (as well as an extra goodie from my dear friend
Robin at Diva's Place!) 

First of all, her card of course had to be paisley-print :) ...with paisley swirls and a sweet turtle both cut from the the Paisley cartridge of course!  I cut the turtle at 1.25", the outside swirl at 1.75", and the inside swirls at 1.25".  The stamps are from Stampin' Up (thanks Robin for letting me borrow some from your stash!).  I used the Martha Stewart doily punch on the front and added a piece of some pink lace border.


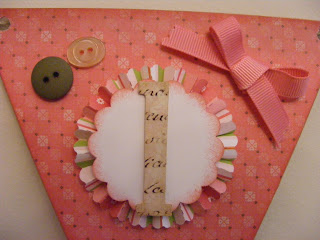
Secondly, I made miss Paizli a banner for her room!  This banner was a combination of supplies from Close To My Heart (Thank you Gina!) and some K&Company chipboard letters.  It has two sides to it, so she and her mommy can decide which side to hang it on! (I made one of these for Carley too with Gina so I'll get it posted soon as well!) :)


*Entered into the My Craft Spot - Monday Challenge
And here's the other side....


Then there's the goodie from Diva's Place!  Thank you Robin for making such a cute ladybug tutu! Her mommy mentioned getting her pictures made with it on! ;) They loved it! 

Published with Blogger-droid v1.6.8